Cheese Board Ideas for the Perfect Dinner Party

Cheese Board Ideas for the Perfect Dinner Party

Imagine this: you walk into a warm, inviting space filled with laughter and the clinking of glasses. The aroma of delicious food wafts through the air, drawing you closer to a beautifully arranged cheese board. But what exactly makes a cheese board irresistible? Are there secret ingredients or pairings that can elevate it from ordinary to extraordinary? Let’s explore the art of crafting the perfect cheese board that will leave your guests raving long after the last crumb has disappeared.

Cheese boards are more than just appetizers; they are an experience. They invite conversation, spark curiosity, and create a sense of community around the dining table. But it’s not just about slapping a few slices of cheese on a platter. The key lies in the thoughtful selection of cheeses, complementary accompaniments, and aesthetic presentation. With a little creativity and inspiration, you can set the stage for a memorable dinner party that your friends will talk about for months.

Choosing the Right Cheeses

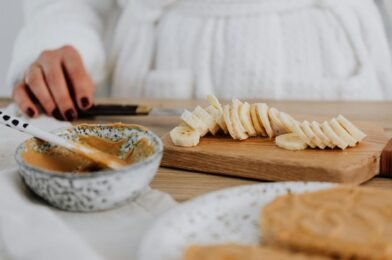
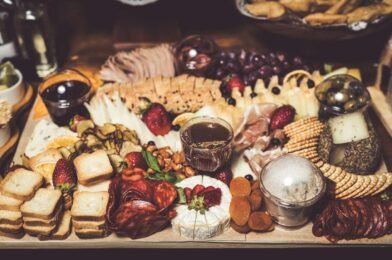
When it comes to your cheese selection, variety is not just the spice of life; it’s essential for a well-rounded cheese board. Aim for a mix of textures and flavors—soft, hard, sharp, and creamy. A well-curated board typically includes a goat cheese, a sharp cheddar, a nutty Gruyère, and a decadent blue cheese. For instance, consider bringing in a creamy Brie that pairs beautifully with fruits and nuts. It’s a crowd-pleaser that’s always a hit at dinner parties. But remember, quality matters. Sourcing artisanal cheeses from local dairies can add a unique touch.

Moreover, let’s not overlook the importance of the cheese’s temperature. The truth is, serving cheese at room temperature allows their flavors to truly shine. Take them out of the fridge at least 30 minutes before serving. This simple step can make a noticeable difference. Have you ever had a cheese that was just… okay? Often, the flavor was muted simply because it was too cold. Let your cheeses breathe, and they will reward you!

Complementary Accompaniments

What’s a cheese board without the perfect accompaniments? To create a symphony of flavors, think beyond just crackers. Include a variety of items such as artisanal breads, marinated olives, fresh fruits like figs and grapes, and even honey or jams for a sweet contrast. Imagine the delightful crunch of a toasted baguette topped with creamy goat cheese and a drizzle of honey. The sweet and savory combination is divine.

Don’t shy away from adding nuts, either. They add a delightful texture and enhance the overall aesthetic of your board. A mix of marcona almonds and walnuts not only tastes great but also brings that rustic charm we all love. While you’re assembling your cheese board, consider arranging these accompaniments in a visually pleasing manner. Just like a painter choosing colors, think about the hues and shapes of each item. It’s like creating a work of art that’s as delicious as it is beautiful.

Presentation Matters

Here’s the thing: the presentation of your cheese board can make or break the experience. A well-arranged board not only looks enticing but also invites interaction. Choose a large wooden cutting board or a slate platter as your canvas. Use small bowls for dips, spreads, or olives to create visual interest. You can even use fresh herbs or edible flowers for an added touch of elegance. The goal is to create a board that encourages sharing and discovery.

Think about the flow as well. Place the cheeses at different points on the board, and group items that pair well together. This approach not only keeps guests engaged but also guides them towards delightful flavor combinations. Picture a soft cheese next to a sweet fig jam— guests will naturally gravitate toward it. Have you ever had a cheese board where you were unsure where to start? That’s what you’re trying to avoid. Your guests should feel excited to dive in!

Seasonal Themes for Your Cheese Board

Embracing seasonal ingredients can take your cheese board to the next level. Consider the time of year and what’s available locally. In the fall, think about incorporating pumpkin-shaped cheeses, alongside spiced pecans and dried cranberries. During spring, fresh herbs and vibrant berries can bring a refreshing touch. Aligning your board with seasonal themes not only enhances flavors but also makes it more visually appealing. Your dinner party can become a celebration of the season itself.

For example, a summer cheese board could feature lighter cheeses like feta or mozzarella, complemented by grilled peaches and fresh basil. Each season offers a unique palette for cheese lovers to explore. Have you noticed how certain flavors evoke memories? By utilizing seasonal ingredients, you can create a sensory experience that resonates with your guests, allowing them to savor not just the food, but the moment itself.

Interactive Elements to Engage Guests

Why not elevate your cheese board experience by adding interactive elements? Consider a “build-your-own” cheese station where guests can combine their favorite cheeses with various toppings. Set out a selection of cheeses, nuts, fruits, and spreads, and let your friends create their own masterpieces. This approach invites conversation and laughter as people experiment and share their unique combinations. It’s like a culinary adventure right at the dinner table!

Another fun idea is to incorporate a wine pairing station. Offer a few different wines and let guests select which ones they want to try with their chosen cheeses. It’s not just a meal; it’s an interactive experience that fosters connection. At the end of the day, isn’t that what dinner parties are all about? Building relationships while indulging in delicious food and drinks can create lasting memories.

Conclusion: Craft Your Perfect Cheese Board

Homemade Hummus Recipe Better Than Store-Bought

Homemade Hummus Recipe: Better Than Store-Bought

Have you ever dipped a crunchy vegetable into a creamy hummus and felt that rush of flavor bliss? If you’ve only ever experienced store-bought varieties, you’re in for a delightful surprise. Homemade hummus is not just fresher; it’s a canvas for your culinary creativity. Imagine whipping up a batch in your own kitchen, customizing it to your taste, and reaping the health benefits without preservatives. Intrigued? You should be!

The truth is, crafting your own hummus is not just about the taste—it’s a whole experience. It allows you to control the ingredients, ensuring everything is fresh, nutritious, and tailored to your preferences. And if you’ve ever compared the ingredients list of store-bought hummus to the simplicity of homemade, you know there’s no contest. So, why not take a little time to explore this delightful and easy-to-make appetizer? Let’s dive into the world of homemade hummus!

Gathering Your Ingredients

Before you can whip up a dreamy bowl of hummus, you need to gather your ingredients. Fortunately, you don’t need a long shopping list. The core of good hummus typically includes chickpeas, tahini, lemon juice, garlic, olive oil, and salt. If you want to jazz things up, consider adding ingredients like roasted red peppers, herbs, or spices to create your signature flavor. Have you ever thought about adding a touch of smoked paprika or caramelized onions? Those small tweaks can elevate your dish to a whole new level.

Let’s not forget about the chickpeas! While you can use canned, cooking your own from dried chickpeas can yield a creamier texture. Simply soak them overnight and boil them for about an hour until tender. This little extra step can make a significant difference and will leave you wondering why you ever opted for store-bought. Think about your last experience with hummus—did it leave you satisfied or longing for more? Homemade guarantees you’ll never feel that way again!

Simple Steps to Create Creamy Hummus

Creating your homemade hummus is a breeze! Start by draining and rinsing your chickpeas. If you want an ultra-smooth texture, you can peel the skins off, though it’s not strictly necessary. Toss the chickpeas into a food processor along with tahini, garlic, lemon juice, and salt. Process until smooth, then slowly drizzle in the olive oil while blending. This technique creates a silky consistency that store-bought versions struggle to achieve.

But don’t stop there! Here’s the thing: flavor is key. Taste your hummus and adjust. Perhaps you want it tangier—add more lemon juice. Need a kick? Toss in some cayenne pepper. You have the power! This stage is crucial because it allows you to make your hummus truly yours. Can you envision serving this at your next gathering and impressing your friends with the depth of flavor? Homemade hummus is sure to be a showstopper!

Serving Suggestions That Wow

Now that you have your homemade hummus ready, the next step is how to serve it. The traditional way is to offer it with pita bread and a selection of fresh veggies. Carrots, cucumbers, and bell peppers all provide that satisfying crunch. But let’s get creative! Why not use it as a spread on sandwiches or a dip for chips? Even as a topping for grilled meats, hummus can bring a delightful twist to your favorite dishes.

A memorable experience I had involved hosting a small gathering where I served my homemade hummus as a centerpiece. I paired it with a colorful platter of sliced vegetables and toasted pita chips. Guests couldn’t get enough; I even overheard someone saying it was « the best they had ever tasted! » That’s the magic of homemade—it’s not just food; it’s an experience. Have you ever had a dish that stole the show at a gathering? Homemade hummus can be that dish!

Health Benefits of Homemade Hummus

When you think about appetizers, the words « healthy » and « delicious » don’t often collide. However, homemade hummus is a delightful exception. Chickpeas are a fantastic source of plant-based protein and fiber, which means they keep you feeling full longer. Additionally, tahini is rich in healthy fats, vitamins, and minerals, making your dip not just tasty but nutritious too.

This combination can aid digestion and provide sustained energy without the crash that often follows processed snacks. What’s more, by making your hummus, you can avoid added sugars and preservatives found in many store-bought options. At the end of the day, it’s about nourishing your body while enjoying something truly delicious. Isn’t that the best of both worlds?

Experimenting with Flavors

One of the best parts of making your own hummus is the opportunity to experiment. Have you ever considered adding roasted garlic instead of raw? Or mixing in fresh herbs like parsley or cilantro for a burst of freshness? Each variation can transform your hummus into a different taste sensation. For instance, roasted beet hummus offers a vibrant color and subtle sweetness—a real crowd-pleaser!

Another fantastic option is to incorporate spices. A hint of cumin can add warmth, while a dash of curry powder brings an exotic flair. The options are virtually limitless. As you delve into the world of hummus-making, what unique combinations will you discover? Each batch can be a new adventure, and that’s what makes it all the more exciting.

A Call to Create and Share

Homemade hummus is not just a dish; it’s an opportunity for creativity, health, and connection. There’s something satisfying about nurturing your culinary skills and sharing them with others. So, why not gather your ingredients and start experimenting? The recipe is straightforward, and the rewards are plentiful. You’ll find yourself looking forward to snack time like never before!

As you embark on your hummus-making journey, don’t hesitate to share your experiences! What flavors will you try? Do you have a favorite twist you’d love to share? Comment below, and let’s inspire each other in the kitchen! Your journey to create better-than-store-bought hummus starts now!

Healthy Snack Ideas for Kids They Actually Love

Healthy Snack Ideas for Kids They Actually Love

Are you tired of the endless struggle to get your kids to eat healthy snacks? You’re not alone. Many parents face the same dilemma: how to provide nutritious options that kids will actually enjoy. The truth is, kids often prefer snacks that are colorful, fun, and tasty. So, let’s dive into some healthy snack ideas that are sure to please even the pickiest eaters.

Imagine this: It’s 3 PM, and the kids come home from school, famished and ready to munch. You want to offer something nutritious, but you also know that if it doesn’t look or taste good, it’ll be rejected outright. The key lies in creativity and a little bit of fun. So how do we create snacks that are both healthy and appealing? Here are some ideas to get you started.

Fruity Fun: Creative Ways to Serve Fruit

Fruits are naturally sweet and packed with vitamins, but sometimes they need a little jazzing up. Consider making a fruit kabob. Simply thread colorful pieces of fruit like strawberries, grapes, and melon onto a skewer. Not only does it look appealing, but kids love the act of eating something on a stick. This playful presentation transforms ordinary fruit into a fun experience.

Another approach is to make a fruit dip. Mix some Greek yogurt with honey and a dash of vanilla. Pair it with apple slices or banana chunks. Kids go crazy over dipping! In fact, I once saw a reluctant fruit eater transform into a fruit lover just because they could dip their apples. What’s your child’s favorite fruit? Try introducing it in a new way!

Veggies with a Twist: Making Greens Desirable

Furthermore, consider baking kale chips for a crunchy, savory snack. Simply toss kale leaves with olive oil and a pinch of salt, then bake them until crispy. They are a delicious alternative to potato chips, and kids won’t even realize they’re eating something healthy. Trust me, it’s a game changer when they think they are indulging in a treat!

Nut Butter Delights: Spreading the Joy

Nuts and nut butters are packed with protein and healthy fats, but they can be enhanced in a way that makes them irresistible. A simple apple slice smeared with almond butter can become a powerhouse of nutrition. Add a sprinkle of cinnamon or some granola for extra texture and flavor. This snack not only fills them up but also provides lasting energy.

Consider making « banana sushi » as well! Take a whole banana, spread it with peanut or almond butter, then roll it in crushed nuts or oats. Slice it into bite-sized pieces, and you’ll have a fun, nutritious snack that feels special. Kids love the idea of sushi, and this simple recipe lets them join in on the creativity. Have your kids helped you in the kitchen? Engaging them can make the process even more enjoyable.

Homemade Snack Bars: A Treat You Control

Store-bought snack bars can often be filled with hidden sugars and preservatives. Why not try making your own at home? With a few simple ingredients—like oats, honey, nut butter, and dried fruits—you can whip up homemade snack bars that are both tasty and healthy. Mix everything together, press it into a pan, chill, and cut into bars.

The beauty of homemade bars is that you can customize them to your child’s taste. If they love chocolate, why not add in some dark chocolate chips? I remember making these with my children, and they enjoyed the process just as much as eating the final product. What’s stopping you from getting creative in the kitchen with your little ones?

Yogurt Parfaits: Layered Goodness

Yogurt can be a delicious and healthy base for a snack. A yogurt parfait is an engaging way to present it. Layer Greek yogurt with granola and fresh berries in a clear cup. The colorful layers are not only visually appealing but also deliciously satisfying. Kids can even help with assembling their own parfaits, which makes it a fun activity!

Adding a drizzle of honey or a sprinkle of nuts can elevate the flavor and texture. Plus, the health benefits of yogurt—like probiotics—can keep their gut healthy. Farm-fresh or organic yogurts can be rich in flavor, making this snack not just healthy but delightful. Have you ever asked your kids to create their own parfait? You might be surprised by their creative combinations!

At the end of the day, healthy snacking doesn’t have to be a chore or a battle. With a little creativity, you can offer snacks that are both nutritious and enjoyable. Kids love colorful, fun, and interactive foods, so why not engage their imagination? Experiment with these ideas and discover what resonates with your family’s taste buds.

What’s your go-to healthy snack for your kids? Let me know in the comments below and share your experiences! Together, we can make healthy snacking a fun part of our kids’ lives.

Easy Appetizers for Parties That Impress Your Guests

Easy Appetizers for Parties That Impress Your Guests

Imagine this: your friends and family are gathered in your living room, laughter filling the air, and the tantalizing aroma of delicious appetizers wafts through the house. As you put down a gorgeous platter of vibrant, flavorful bites, everyone’s eyes light up with anticipation. Have you ever wondered how you can create that kind of atmosphere with minimal stress? The truth is, impressing your guests doesn’t have to mean spending hours in the kitchen. With a few easy, yet sophisticated appetizer options, you’ll be the star of your next gathering.

Whether you’re hosting a cozy get-together or a grand celebration, the right appetizers can elevate the experience. They serve as the perfect icebreaker and keep the energy flowing as conversations unfold. From crispy bites to refreshing dips, the choices are endless. But how do you choose the right ones? Let’s dive into some crowd-pleasing options that will leave your guests raving long after the plates are empty.

1. Bite-Sized Bruschetta: A Classic with a Twist

Bruschetta is one of those timeless appetizers that never goes out of style. The base is simple: toasted bread topped with a variety of ingredients. But here’s the twist that makes it unforgettable. Instead of the traditional tomato topping, try a combination of roasted red peppers, feta cheese, and a drizzle of balsamic glaze. Not only does this give a flavor punch, but the presentation looks stunning as well.

Picture this: a vibrant platter of colorful bruschetta sitting at the center of your dining table. One evening, I made these for a small gathering. As my guests took their first bites, their faces lit up with delight. They couldn’t wait to grab another! It was an effortless way to create a warm and inviting atmosphere, and they were all asking for the recipe by the end of the night. What more could you ask for?

2. Stuffed Mini Peppers: A Colorful Delight

When it comes to appetizers that both look good and taste fantastic, stuffed mini peppers are a showstopper. These little gems are not only visually appealing but are also a breeze to prepare. You can stuff them with a mixture of cream cheese, herbs, and spices, or even go for a savory mix of quinoa, black beans, and spices for a healthier option.

Here’s the thing: the vibrant colors of the mini peppers make them a perfect centerpiece for your appetizer spread. I once made these for a summer barbecue, and they disappeared within minutes. Guests were raving about the flavor and asking how I managed to make them so pretty! What’s fantastic is that you can easily customize the stuffing to suit your guests’ preferences, ensuring everyone finds something they love.

3. Deviled Eggs with a Modern Twist

Deviled eggs are a staple at any gathering, but why not revamp this classic? Instead of the traditional filling, try incorporating avocado or sriracha for a modern twist. The creamy texture of avocado adds a delightful richness, while sriracha brings a kick your guests will adore.

Let me share a little story: At a recent brunch with friends, I decided to surprise everyone with these spicy avocado deviled eggs. Each bite was met with “wow” and “I need this recipe!” It was amazing to see how a beloved classic could be reinvented simply by swapping out a couple of ingredients. Plus, they’re also gluten-free, making them a great option for all dietary needs. Are you ready to impress with this delightful twist?

4. Cheese and Charcuterie Board: The Ultimate Crowd-Pleaser

No gathering is complete without a beautiful cheese and charcuterie board. The best part? You can make it as simple or elaborate as you like. Begin with a selection of cheeses, meats, olives, and crackers. Add some fresh fruits and nuts to create a balanced offering that looks as good as it tastes.

One time, I hosted a wine tasting evening, and I spent a little time preparing my cheese board. As I arranged the items, I found joy in the creativity of it all. Guests were drawn to the board, enjoying the variety and flavors while mingling. The combinations were endless, with different textures and tastes mingling beautifully. It sparked lively conversations, and I realized how a simple board could become the heart of the gathering. Are you up for creating your own memorable masterpiece?

5. Easy Dips: Bring on the Flavor

Dips have a way of bringing people together. Picture this: a creamy spinach and artichoke dip served with crispy tortilla chips or fresh veggie sticks. Dips can be made in advance, which is a lifesaver when you’re juggling multiple dishes. Plus, they offer variety, catering to different preferences.

During one event, I made a classic hummus paired with a zesty garlic dip. To my surprise, they were the stars of the evening! Guests were praising the flavors and even asking for the recipes. It reminded me that simple can be utterly delightful, sparking connections through shared tastes and experiences.

Conclusion

Crafting the perfect appetizers doesn’t have to be complicated. With a little creativity and some easy-to-prepare recipes, you can impress your guests without breaking a sweat. So, the next time you’re planning a gathering, consider these crowd-pleasing options. They not only tantalize taste buds but also create memorable moments. What’s your favorite go-to appetizer? Share your thoughts in the comments below and let’s keep the conversation going!